Showing posts with label DIY. Show all posts

Monday, March 27, 2017

Bath renovation ideas...


Universe never seem to deliver on your terms... it just does when it does!
I'm gonna skip the background story and just mention that we had some extensive water damage in our house last month which has forced us to look into remodeling bathrooms in our house.
Although it was on my wish list to update the bathroom when we moved in last year but right now is not a convenient time for a remodel... but as they say, be careful what you wish for!
Needless to say its been stressful around here, it seems no good contractor is available to work on an emergency remodeling project, most of them are booked months in advance. So, while I wait to for the schedule of plumber and dry-wall guy and carpenter to line up, I decided its a good time to go on an inspiration trip on the internet.
I like clean and straight lines and white for me is the best color when it comes home décor, its peaceful, calm and timeless.


Saturday, January 02, 2016

What a can of paint can do?

For past many years, my laundry loads were sorted into: Lights, Darks and Pinks…
Being a mother of two girls, I got so used to it that I never imagined this phase would ever end, it was my normal whether I liked it or not. So, it was an interesting process trying to untwine myself  of this accepted fact and start adjusting with the next phase of my girl's life…
Hello, Preteen years!
The first qualifying task to test my agility as a mother of a tween was to get rid of this pink chair.

Tuesday, December 08, 2015

A quick Wall Mural

Its been a few months living in California and I have made a few friend, met some of my neighbors and still some days are very tough to get through. This change is a daily reminder of the inevitability and unpredictability of life… tomorrow is not guaranteed! 
This mural happened during one such day where I refused to give in and decided to channel my confusion and desperation into something eye-catching. DH was out of town for business so he couldn't pull me out of my trance and I made it with the expectation that if he doesn't like it, I'll paint right over it and bought a pint of background color in advance.

Wednesday, December 02, 2015

Easy Canopy bed for kids

A few years ago we started out our girls in a shared bedroom and playing room but keeping in mind that the furniture is coordinated and flexible for the time when the girls would want their own rooms. Well, my younger one decided that she wants a canopy bed… something I hadn't planned for. Even though Pottery Barn makes beautiful canopy beds, I couldn't order a canopy kit for the Catalina bed that we had and I didn't want to upgrade the whole bed for what might end up being a passing fancy.

Tuesday, December 01, 2015

Making Fabric Banner

If you have been following me on instagram, you'd know that I bought a sewing machine a couple months ago and you possibly might have seen swatches of my fabric banner project as well. Well, here's the first finished project that I made on my new sewing machine and tomorrow I'll share how I ended up using it in my daughter's pink room

Thursday, September 24, 2015

Chevron wall - pink and white

Personalizing our personal spaces with colors is one of the big tool that we are using for dealing with change. I asked my girlie, what would she like to see in her room and she said,"it should be bright and cheerful and it should bring a smile to whoever is entering the room and that they should know that its my room even if I'm not there to welcome them. 

Thursday, October 24, 2013

Monarch butterfly costume - DIY

I love it when my kids get creative with the Halloween costumes. There is nothing better than thinking outside the box (box stores in this case).
So last year when my girl said she wanted to be monarch butterfly, I got beyond excited because I knew I will not be ordering this costume online or buying it from a party store, I will be creating it.

Monday, October 07, 2013

Meet Leah from Sprickets Pottery

I met Leah at a Birthday party where she had brought the experience of pottery painting to little kids in the comfort of a home. It was a fun party and as much as the kids enjoyed it, the better part was watching the creative juices of adults running wild as they helped the little ones.

Remember I had mentioned decorating the 'Finger print Salsa Plate' with preschoolers for the school fundraiser. It was a tough task to excuse little kids from their classroom activities so that they can donate their finger prints to my art plate while maintaining complete silence as they walked in the lobby of the school to the craft room; and then expecting them to go back to their class and jump right back into their respective activities. I wish I had discovered Sprickets Pottery then and it could be a lunch hour activity or an after school activity for the little kids. But I am glad I could connect with her...


Once I discovered Sprickets, Leah became part of our school activities and it is wonderful to have the set up outdoors and paint under the blue sky and sometimes on windy days as well.
Leah agreed to give a brief interview about the work that she does and I hope with this post more folks can discover a local business that facilitates art.


DISCLAIMER: This is not a Commercial post. I am not benefitting from posting about this business.
I think that 'Sprickets Pottery' is a beautiful & creative opportunity for families and friends to come together and create art and memories in the comfort of a place of your choice. 

The interview follows...

Friday, September 27, 2013

Kanjivaram Sari inspired painted IKEA step stool

This IKEA stool (BEKVÄM) retired from its services in the kids bathroom since both girls can now reach the sink without any external aid. It sat in the garage among the donation pile for a couple of months before I brought it back inside. It was a sturdy wooden stool still functional except the unsightly toothpaste blotches so I decided to rescue it with some paint. 
I had picked up a pint of  SW Blue Mosque on an impulse a few weeks ago and it seemed perfect for the stool. It was bright enough to make a statement and dark enough to bear some rough use. 
It took a couple of coats to fully cover the wood and looked beautiful in itself but I was looking for a little more spunk and so I decided to add some accent color. 
The bare blue stool had a fabulous color and I wished, I had a sari that color  (I secretly wish to own saris in all colors that inspire and move me...). It was that wish which prompted me to add a gold border to the base of the stool, much like the gold zari border of a Kanjivaram sari 


The gold paint is a craft acrylic color that I had on hand but since it is just used on the leg of the stool which doesn't get rubbed so often so I think it should hold up well, else I'll give it another touch-up coat.
Here's the final product: 

I am planning to secure the top of the stool with polyurethane or wax to increase the longevity of the paint but that needs another trip to the hardware store so I am calling it done for now. 
Very happy with my Kanjivarm inspired painting on the stool and I think it would be an elegant addition to the study room where the girls still need help reaching the top book shelves... 
I had some extra paint left in the dish that would just have to be washed off so I put it to good use by painting the inside of this wooden dish that I use for holder paperclips, erasers and other small things.


Monday, July 29, 2013

Maxi summer dresses

I love quick projects; they are like instant gratification and add just the right amount of tingle in your brain to make the necessary chores around the house more bearable. So ended up making a couple of Maxi dresses for the girls over the weekend...

Monday, March 18, 2013

Persnalize T-shirt with Stenciling using Acrylics

One of my friend was looking to create some unique yoga shirts for her team and asked me if I knew of quick and easy way. I had heard of the freezer paper stencils but had never tried them myself, so using the trusted Google, I came across this very help tutorial at Ruffles & Stuff
When it was time to make special T-shirts for my daughter's, 'Jump Rope for Heart' team; this tutorial came in very handy. I pretty much followed all her steps and then I had to make a few mistakes of my own, just to learn from them. Here is what the final product looked like...


Thursday, February 28, 2013

Spring Wreath


This post must come across as a contradiction after the last pictures of February snow but what can I say, my relationship with winter is a classic Love-Hate…

Some days I welcome snow with my arms open and on other days I am gently suggesting that it has overstayed its welcome. And on days in between, I realize my minuscule power over nature and I keep telling myself… it too shall pass, just like all the other winters preceding this one.

Yesterday evening as I pulled into the driveway and witnessed the battle between the glow of the setting sun and the mound of the snow-ice mix in the yard, I decided to empower the feeling of warmth and change the wreath on my doorway to something spring.


Saturday, May 26, 2012

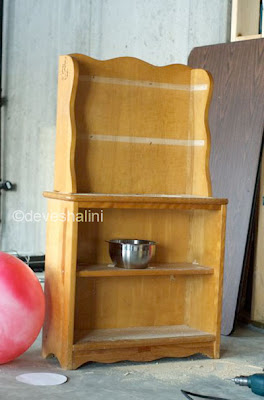
DIY- Book Shelf to Play Kitchen

On Earth Day we finished a long pending project and I shared the before and after picture of the finished Play Kitchen. The next few slides are a quick visual re-cap of the entire process. 
The process is self explanatory and there is a lot of information already available on the internet if you are inspired to make one of your own. 

The original book shelf with steel bowl

Primed and painted shelf with bowl as sink

Doors attached for Oven and Fridge

Glass coasters with black felt as heating element

Sink and cooking stove

A store bought Microwave in the shelf

Measuring bowl as sink

A picture frame for oven door

The kitchen ready to play (cook)


The final product is well loved and I wish the girls get a few years of play out of it before we are ready to pass it on to someone else.... In the meanwhile, hope its inspiring some dreams for those who play and also those who facilitate playing.


Sunday, March 04, 2012

Fiesta Plate with thumb prints

Volunteering at young kids’ school is a very fulfilling experience. I'll put it in the same category as spending time with your nieces and nephews. You can have fun, spoil them, buy them presents, feed them candy and before the sugar rush hits, you get to go home. No need to discipline them, grade them or monitor their progress... You get the point, right?


Last month, I helped second graders type up their story so that they can illustrate them and publish their own stories. It was such a great insight and a wonderful new perspective to encounter. As I read the stories while correcting small mistakes and helping them find letters on the keyboard, I realized these kids are their own unique authors with different styles of writing. Some like to talk one on one in their stories, others indulge in smaller details of life. There were some that like to make up their own words to make it sound funny and carry the full impact. There were also some that really liked drama that used blood and scratches and falling down on the roadway with elaborate attention. Reading their stories were equally fun but if they all take up writing as their career, I already know which ones would be my favorite assuming that they don’t curb their natural style.

Speaking of volunteering for kids, Last week was the big fundraiser for kids school and I helped out with the class project. It was a chip and salsa plate that we decorated in the ‘fiesta’ theme using thumb prints and then adding a few strokes to make them look like salsa ingredients. Of course it totally depended on the same the kids printed but we had everything from garlic and spring onions to avocado and lime. Here are some shots of the plate in the making.


Tiny little thumb prints

Numbers to identify the kids


Plate finalized, just before glazing


Plate ready for auction

I hope this dish inspires you to take up a project of your own, just with the little ones or for the whole family. I also helped decorate the dinning /silent auction room for the ‘fiesta’ gathering and will share those with you too in another post.

Thursday, February 16, 2012

Fabric as door screen

This Sunday presented to be a very opportune day when we could hang out at our home together as a family. The ice skating class for kids wasn’t there and had I know it before; I’d have scheduled us for another activity. We also wanted to go see our friends’ new baby but she wasn’t feeling well so we dropped the plan. And I don’t know for what particular reason but we scuttled our plan to go to ‘Mall of America’ too.


And since I started hyperventilating and wallow myself in guilt if at the end of a relaxing day I have nothing to show for but my calm nerves (hypothetically), it was fortunate that we (DH & I) could finish up this quick DIY project.

Our front door has quite a bit of glass in it and though it’s extremely desirable on long summer days, it left us wishing for a little more privacy during the short days of Fall. We wanted a quick, clean solution for the time being till our contractor can come back and change the door style for us.

I got this idea of using fabric as wall paper from ‘how about orange’. The execution once we got around to doing it was pretty simple, got the fabric from IKEA and made wall-paper paste from flour (Recipe).

Everything else is self-explanatory in the pictures; needless to say we love the results and don’t have to worry who can peek into our living room when it’s dark at 5:00pm in the evening.


Before

Wall paper paste on fabric

During

After 1

After

Tuesday, January 10, 2012

Repurposed shelf for kids room


Sharing this project, which has been in the pipeline for quite sometime, but I finished it very recently. I think I acquired this piece a couple of years ago from a garage sale and it sat in the garage collecting dust and served a shelter to spiders until late last year when during a cleaning spree I had to make a quick decision if I wanted to keep it or let it go and I decided to revamp it.

I think, it was meant to be used as a jewelry-hanging shelf but I didn’t care for the numerous hooks and little shelves. First I removed all the little hooks and gave it a good rinse. Then I primed the piece with the kilz primer. Since it was a piece for kids’ room, I let them help me and take the ownership of the piece.  


I used left over spray paint from my sofa project, the heirloom white that goes perfect with the Shermin Williams’s antique white, the color of the baseboard and trim in the room.


After it dried completely and then some, I finally found the time to decoupage paper that coordinated with the colors of the room. I did contemplate using gray base color for the papers to ground the colors in the room but finally found a balance in my scrapbooking supplies Basic Grey’s Oh Baby series. It is an old package that I used for some of the girls’ baby pages and had the perfect balance for colors and subdued background.

The piece is now complete and waiting to be hung up. The girls have plans to display some recently acquired squinkies and little books and I am looking forward to it all. 


Tuesday, July 19, 2011

The new old Sofa

Sometimes things don't go as you plan them. Mmm, wait they usually never go as per plan and each new changing plan is a challenge that the universe throws at you to see where you are choosing to dig your heels and when you are planning to go with the flow.
I know these words almost seem cryptic so in short I had good intentions to post every single day of this July month but I decided to go with the flow rather than taming my mind and keeping it under control. I still have a few topics that are still relevant and intend to post them ... sometime.
Sharing my Sofa project here:


Wednesday, June 25, 2008

Cupcakes + Photo Cube...

Sharing a few recent projects...
Cupcakes cards.
I made these as part of a birthday card swap, I really like the way they turned out and it wasn't too hard to make either.


A little photo cube that I made for my daughter's teacher with her family pictures, another easy to put together project...